Elasticsearch笔记
Elasticsearch概括
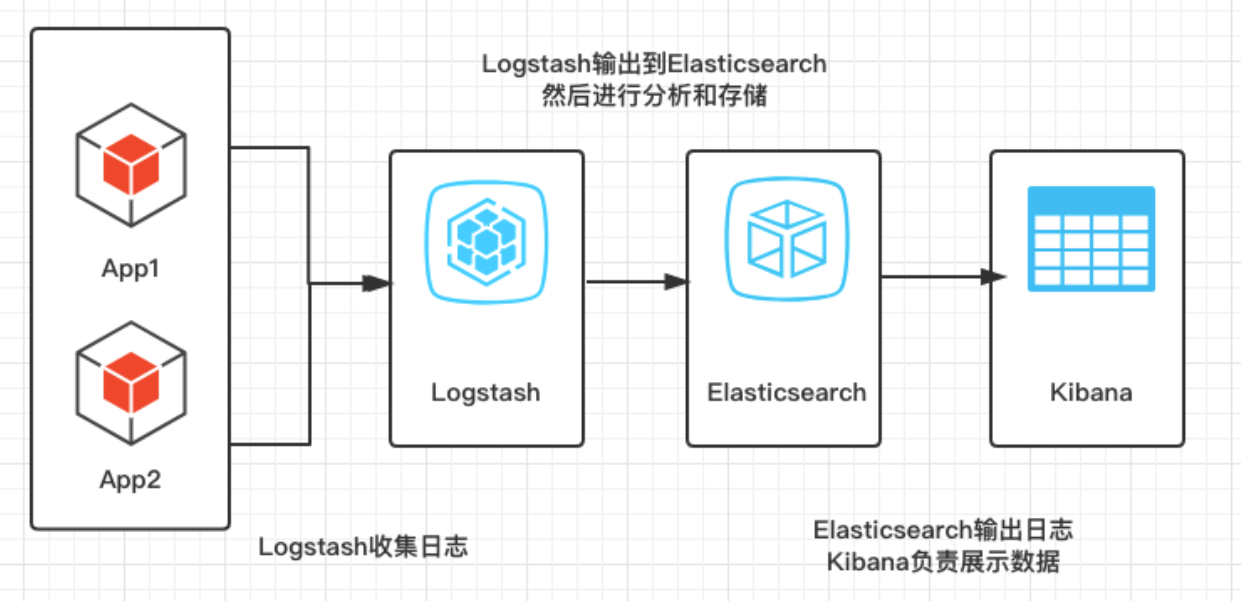
ELK简介
ELK是以Elasticsearch为核心的技术栈,包括Elasticsearch、Logstash、Kibana、Beats
| ELK | 简介 |
|---|---|
| Elasticsearch | 存储,计算,搜索,实时的分布式搜索和分析引擎,可以用于全文搜索,结构化搜索以及分析 |
| Logstash+Beats | 数据抓取,具有实时渠道能力的数据收集引擎 |
| Kibana | 数据可视化,分析和可视化的 Web 平台 |
Elasticsearch简介
(1)Elasticsearch是一个开源的分布式的RESTful 风格的搜索和数据分析引擎
(2)Elasticsearch可以用来实现搜索、日志统计、分析、系统监控等功能
(3)Elasticsearch底层是基于Lucene搜索引擎构建的,利用了Lucene的核心代码来实现全文搜索和分析,对Lucene进行了进一步的封装和优化,提供了更加简单和易用的RESTful API,从而能够更方便地进行搜索和分析操作(Lucene是一款使用Java语言编写的功能强大的全文索引和搜索引擎,是Apache公司的顶级项目)
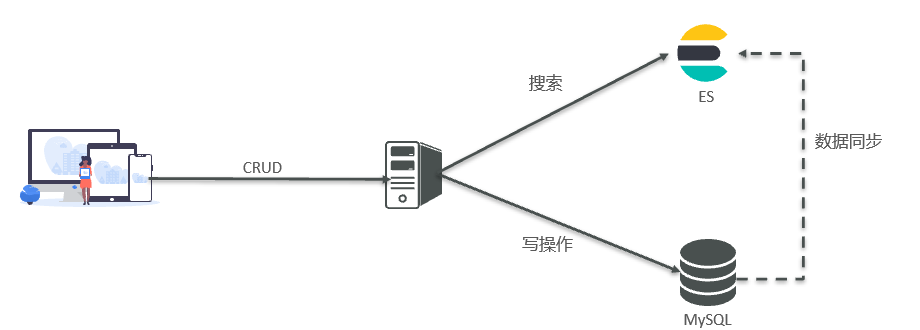
MySQL与Elasticsearch的关系
| 区别 | 简介 |
|---|---|
| Mysql | 擅长事务类型操作,可以确保数据的安全和一致性 |
| Elasticsearch | 擅长海量数据的搜索、分析、计算 |
MySQL与Elasticsearch概念差异
| MySQL | Elasticsearch | 说明 |
|---|---|---|
| 表(Table) | 索引(Index) | 文档的集合,类似数据库的表(table) |
| 行(Row) | 文档(Document) | 一条条的数据,类似数据库中的行(Row),文档都是JSON格式 |
| 列(Column) | 字段(Field) | JSON文档中的字段,类似数据库中的列(Column) |
| 约束(Schema) | 映射(Mapping) | 索引中文档的约束,例如字段类型约束。类似数据库的表结构(Schema) |
| SQL | DSL | Elasticsearch提供的JSON风格的请求语句,用来操作elasticsearch,实现CRUD |
倒排索引
倒排索引是什么
倒排索引(Inverted Index)是一种常见的文本索引结构,用于提高搜索引擎和数据库系统的检索效率。
它通过将文档中的关键词作为索引项,在索引中记录关键词出现的位置信息,从而实现快速的关键词搜索。
倒排索引两个主要部分
词典(Dictionary):保存了所有出现过的关键词,在搜索时可以根据关键词快速定位到对应的倒排列表。
倒排列表(Inverted List):记录了每个关键词在哪些文档中出现以及出现的位置信息。
正向索引和倒排索引的举例
(1)假设我们有三篇文章
1 | 文档1:我喜欢踢足球 |
(2)对于这些文章,它们的正向索引可以表示为
1 | 文档1:我、喜欢、踢、足球 |
(3)倒排索引可以表示为
1 | 我:文档1、文档2、文档3 |
(4)正向索引:如果用户搜索 “文档3”,那么根据正向索引,我们可以很快地找到文档3的内容:”我喜欢玩游戏”。
(5)倒排索引:如果用户没有直接输入文档编号,而是输入了一些关键词,则可以使用倒排索引来查找相关的文档
(6)对于搜索而言,使用正排索引进行搜索是一个较慢的过程,通过倒排索引搜索就非常快
- 正向索引在搜索时需要遍历整个索引,查找包含指定关键词的所有文档,因此相对比较慢。
- 倒排索引通过将关键词与对应的文档列表关联起来,使得搜索时可以直接通过关键词快速定位到相关的文档
Elasticsearch和Kibana安装
准备阶段
(1)准备一台可以使用的虚拟机,已经安装了docker环境
(2)使用docker创建一个网络
1 | docker network create es-net |
(3)Elasticsearch和kibana镜像体积接近1G,不建议pull拉取,将镜像的tar包上传到虚拟机中,然后运行命令加载
1 | docker load -i es.tar |
部署单点ES
(1)运行docker命令,部署单点ES
1 | docker run -d \ |
| 参数 | 简介 |
|---|---|
| -e “cluster.name=es-docker-cluster” | 设置集群名称 |
| -e “http.host=0.0.0.0” | 监听的地址,可以外网访问 |
| -e “ES_JAVA_OPTS=-Xms512m -Xmx512m” | 内存大小 |
| -e “discovery.type=single-node” | 非集群模式 |
| -v es-data:/usr/share/elasticsearch/data | 挂载逻辑卷,绑定es的数据目录 |
| -v es-logs:/usr/share/elasticsearch/logs | 挂载逻辑卷,绑定es的日志目录 |
| -v es-plugins:/usr/share/elasticsearch/plugins | 挂载逻辑卷,绑定es的插件目录 |
| –privileged | 授予逻辑卷访问权 |
| –network es-net | 加入一个名为es-net的网络中 |
| -p 9200:9200 | 端口映射配置 |
(2)在浏览器中查看elasticsearch的响应结果:http://主机地址:9200/
Kibana安装
(1)运行docker命令,部署kibana
1 | docker run -d \ |
| 参数 | 简介 |
|---|---|
| –name kibana | 指定docker镜像运行时的name |
| –network es-net | 加入一个名为es-net的网络中,与elasticsearch在同一个网络中 |
| -e ELASTICSEARCH_HOSTS=http://es:9200 | 设置elasticsearch的地址,连接elasticsearch 因为kibana已经与elasticsearch在一个网络,因此可以用容器名直接访问elasticsearch |
| -e “I18N_LOCALE=zh-CN” | kibana 汉化,将语言指定为汉语 |
| -p 5601:5601 | 端口映射配置 |
(2)启动kibana,一般启动比较慢,需要多等待一会
1 | docker logs -f kibana |
(3)在浏览器输入地址查看结果:http://主机地址:5601/
操作ES的RESTful语法
| 语法 | 简介 |
|---|---|
| GET请求 | 查询 |
| POST请求 | 新增数据 |
| PUT请求 | 一般用于修改 |
| DELETE请求 | 删除 |
入门使用(_cat)
Elasticsearch 都是通过 REST API 接口来操作数据的,所以可以利用接口测试工具简单使用Elasticsearch
| 接口 | 简介 |
|---|---|
| GET http://主机地址:9200/_cat/nodes | 查看所有节点(/_cat/nodes) |
| GET http://主机地址:9200/_cat/health | 查看ES健康状况(/_cat/health) |
| GET http://主机地址:9200/_cat/master | 查看主节点信息(/_cat/master) |
| GET http://主机地址:9200/_cat/indices | 查看所有索引(/_cat/indicies) |
Index索引
创建
| 语法 | 作用 |
|---|---|
PUT /index_name | 创建一个新的索引 |
PUT /index_name_alias | 创建新的索引别名 |
PUT /_template/template_name | 创建新的模板 |
查询
| 语法 | 作用 |
|---|---|
GET /_cat/indices?v | 获取所有索引信息 |
GET /_cat/indices/index_name?v | 获取特定索引的信息 |
GET /_cat/templates?v | 获取所有模板信息 |
GET /_cat/templates/template_name?v | 获取特定模板的信息 |
删除
| 语法 | 作用 |
|---|---|
DELETE /index_name | 删除整个索引 |
DELETE /index_name_alias | 删除索引别名 |
DELETE /_template/template_name | 删除模板 |
修改
| 语法 | 作用 |
|---|---|
PUT /index_name/_settings | 更改分片相关配置 |
PUT /index_name/_alias/alias_name | 添加新的索引别名 |
POST /index_name/_close, POST /index_name/_open | 关闭、打开索引 |
POST /_aliases | 批量更新索引别名 |
Mapping映射
创建
| 语法 | 作用 |
|---|---|
PUT /index_name | 创建一个新的索引 |
PUT /index_name/_mapping | 创建新的映射 |
查询
| 语法 | 作用 |
|---|---|
GET /index_name | 获取索引信息 |
GET /index_name/_mapping | 获取特定索引的映射 |
GET /index_name/_mapping/field_name | 获取特定字段的映射 |
删除
| 语法 | 作用 |
|---|---|
DELETE /index_name | 删除整个索引 |
DELETE /index_name/_mapping | 删除整个映射 |
DELETE /index_name/_mapping/field_name | 删除特定字段的映射 |
修改
| 语法 | 作用 |
|---|---|
PUT /index_name/_mapping/field_type | 添加新字段 |
PUT /index_name/_mapping | 更新整个映射 |
POST /index_name/_update_by_query | 执行查询并进行更新 |
PUT /index_name/_settings | 更改分片相关配置 |
Document文档
创建
| 语法 | 作用 |
|---|---|
PUT /index_name/_doc/document_id | 创建新文档 |
POST /index_name/_doc | 自动生成文档 ID 并创建新文档 |
查询
| 语法 | 作用 |
|---|---|
GET /index_name/_doc/document_id | 获取特定的文档 |
GET /index_name/_search | 搜索整个索引中文档 |
GET /index_name/_mget | 获取多个文档 |
GET /index_name/_count | 获取匹配查询条件的文档数量 |
删除
| 语法 | 作用 |
|---|---|
DELETE /index_name/_doc/document_id | 删除单个文档 |
DELETE /index_name | 删除整个索引 |
DELETE /index_name/_query | 删除匹配查询条件的所有文档 |
修改
| 语法 | 作用 |
|---|---|
POST /index_name/_update/document_id | 更新现有文档 |
PUT /index_name/_mapping | 更新整个映射 |
POST /index_name/_reindex | 在不同索引之间重新索引文档 |
分词器
将一段文本,按照一定的逻辑,分析成多个词语的一种工具
Elasticsearch内置的分词器
| 分词器 | 简介 |
|---|---|
| Standard tokenizer | 标准分词器,按照非字母字符进行切分 |
| Letter tokenizer | 字母分词器,将非字母字符作为分隔符,只保留字母 |
| Lowercase tokenizer | 小写分词器,将所有文本转为小写 |
| Whitespace tokenizer | 空格分词器,以空格作为分隔符 |
| Keyword tokenizer | 关键字分词器,将整个文本作为一个单独的关键字 |
| Path hierarchy tokenizer | 路径分层分词器,根据路径中的斜杠(/)进行分词,并生成层级结构 |
| Edge NGram tokenizer | 边缘NGram分词器,按照指定长度从文本的开头开始生成N-Gram序列 |
| N-Gram tokenizer | NGram分词器,将文本按照指定长度生成N-Gram序列 |
| Pattern tokenizer | 模式分词器,使用正则表达式进行文本切分 |
| Uax URL email tokenizer | URL和电子邮件地址分词器,能够识别URL和电子邮件地址,并将它们视为单独的词语。 |
IK分词器安装
Elasticsearch内置的分词器一般都是针对于英文,对于中文的处理方式为一个字一个词,而我们在搜索时,需要对用户输入内容分词,处理中文分词,一般会使用IK分词器
(1)安装插件需要知道elasticsearch的plugins目录位置,而我们用了数据卷挂载,因此需要查看elasticsearch的数据卷目录
1 | docker volume inspect es-plugins |
运行结果如下,说明plugins目录被挂载到了/var/lib/docker/volumes/es-plugins/_data 这个目录中
1 | [ |
(2)进入挂载目录,上传到es容器的插件数据卷中
1 | cd /var/lib/docker/volumes/es-plugins/_data |
(3)重启容器
1 | docker restart es |
Ik分词器拓展词库与停用词库
(1)进入ik分词器目录中的config目录
1 | cd /var/lib/docker/volumes/es-plugins/_data/ik/config |
(2)修改IkAnalyzer.cfg.xml文件
1 | vim IKAnalyzer.cfg.xml |
1 |
|
(3)创建名为ext.dic的文件,添加拓展词语
1 | vim ext.dic |
(4)创建名为stopword.dic的文件,添加停用词语
1 | vim stopword.dic |
(5)重启容器
1 | docker restart es |
Query DSL
完整Query DSL语法
1 | { |
Java操作ES
Java操作Elasticsearch方案
| 方案 | 简介 |
|---|---|
| 直接使用 HTTP 请求 | 直接使用 HTTP 请求去操作 Es,可以使用 Java 自带的 HttpUrlConnection, 也可以使用一些 HTTP 请求库:HttpClient、OKHttp、Spring 中的 RestTemplate等 弊端:自己组装请求参数,自己去解析响应的 JSON |
| TransportClient客户端 | 传统客户端,使用Transport 接口进行通信,能够使用ES集群中的一些特性 TransportClient 在 Es7 中已经被弃用,在 Es8 中将被完全删除 |
| Low Level REST Client | 用于 Es 的官方的低级客户端,这种方式允许通过 HTTP 与 Es 集群进行通信, 优势:兼容所有的 Es 版本。弊端:求 JSON 参数和响应 JSON 参数交给用户去处理 |
| High Level REST Client | 用户 Es 的官方的高级客户端,基于 Low LevelREST Client 提供了很多 API,这种方式允许通过 HTTP 与 Es 集群进行通信 开发者不需要自己去组装参数,也不需要自己去解析响应 JSON 但要求对ES的DSL语句熟悉,方便自己做复杂的增删改查,并且使用的依赖库的版本要和 Es 对应 |
| Spring Data Elasticsearch | 这是Spring官方最推荐的,就像JPA,Mybatisplus一样,在DAO层继承ElasticsearchRepository接口 就可以使用封装好的一些常见的操作了,用起来简单方便。 |
使用 HTTP 请求操作ES
准备工作
(1)引入依赖
1 | <!-- 支持http协议的客户端编程工具包 --> |
(2)封装工具类
1 | public class HttpClientUtils { |
(3)实体类
1 |
|
操作索引测试
1 | public class IndexTest { |
操作文档测试
1 | public class DocumentTest { |
使用RestHighLevelClient操作ES
准备工作
(1)引入依赖
1 | <!-- ES客户端 --> |
(2)添加实体类
1 |
|
操作索引测试
1 | public class IndexTest { |
操作文档测试
1 | public class DocumentTest { |
使用SpringDataElasticsearch操作ES
准备工作
(1)在MySQL数据库创建表
1 | DROP TABLE IF EXISTS `user`; |
(2)创建Maven工程,添加依赖
1 | <!-- parent标签类似java中的继承,复用依赖,减少冗余配置 --> |
(3)创建application.yml配置文件
1 | spring: |
(4)表对应的实体类,添加合适的注解
1 | // jse提供的注解,屏蔽无关紧要的警告。 |
(5)启动类
1 | // @MapperScan注解:MyBatis提供的注解,用于扫描 指定 文件夹 映射Mapper接⼝类 |
数据访问层
(1)Mybatis(plus)框架编写Mapper接口实现数据访问层的开发,需要继承BaseMapper<T>,T为任意实体对象
1 |
|
(2)SpringDataElasticsearch框架编写Repository接口实现数据访问层的开发,需要继承ElasticsearchRepository<T, ID>接口,T为实体类对象,ID是实体类中通过@Id注解所标注的属性的类型
1 |
|
测试类
编写测试类,调用Repository中定义的方法来访问Elasticsearch中的数据
1 |
|